Platys - Platform in a box
What is Platys?
Platys is an open source tool for generating and provisioning Modern Data Platforms based on Docker and Docker Compose. Its main use is for small-scale Data Lab projects, Proof-of-Concepts (PoC) or Proof-of-value (PoV) projects as well as trainings. The user of platys can choose which services to use from a list of supported services and generate a fully working docker-compose.yml file including all necessary configuration files.
This replaces our old approach, where we only had a static docker-compose.yml file with all services enabled by default. By generating the docker-compose.yml, the user has very fine-grained control on which services to include for a given platform.
How does Platys work?
The folowing diagram shows the building blocks of platys and the basic flow when working with it.
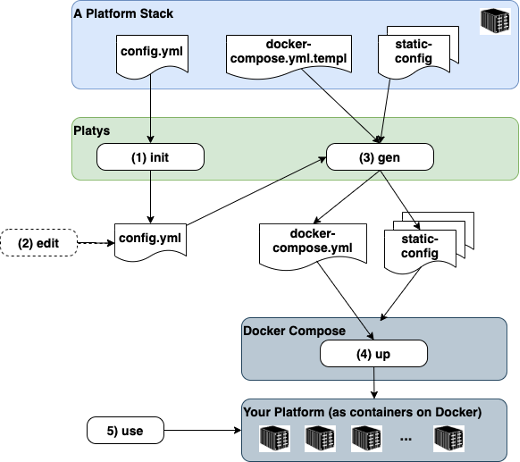
A concrete Platform is always generated based on a given Platform Stack. A platform stack defines the set of available and usable services and has a name and a version. The diagram also shows the five necessary steps to create a new platform and use it.
- Initialise a new Platform context by specifying a Platform Stack. Optionally, a set of services to be enabled, can be specified with the init command.
- Optionally edit the config.yml to enable services and change default values of configuration settings.
- Generate the artefacts for the platform (mainly the docker-compose.yml but also some configuration files) by running the gen command.
- Run docker-compose up to start your platform. Currently there is one Platform Stack publicly available, supporting a Modern (Analytical) Data Platforms. In the future, other platform stacks might be added.
Why did we build Platys?
There is no question that running workloads in containers simplifies deployment of applications. But one container is never enough, you need more than one container to implement a working solution, such as database, business logic, event broker ... and you need a Container Orchestration to manage these containers.
Today Kubernetes is the most popular container orchestrator, but it comes with a lot of complexity. For production setups, Kubernetes is definitely one way to go. But for local, development or small-scale Proof-of-Concepts, we like to use Docker Compose, a very simple approach to container orchestration. With Compose, you use a YAML file to configure your application’s services.
Especially as a consultant, coach, trainer, technology evangelist, you will be using different Compose setups for different environments.
The longer you use Docker Compose, the more of these YAML files you get and to maintain them is quite a challenge:
- But how do you easily upgrade to a new version of a container, i.e. Apache Kafka?
- Do you manually have to go through all of these Compose files, which is a lot of work and prone to errors?
- What if you want to add a new service to one environment and you know that you have used it previously in another environment?
- Do you copy-paste configs from one YAML to another?
- How do you make sure that one service from another environment will work with all the configs and port settings of your other environment? For these and some other challenges we were looking for a better solution:
- Wouldn't it be easier to generate the Docker Compose YAML, based on a simple configuration with some ON/OFF switches of all supported services?
Enter the world of platys...
Platys is supported on Windows, macOS and 64-bit Linux.
Behind the scenes, platys runs the generator (supporting given Platform Stack) as a Docker container. Therefore, you need to have Docker installed on the machine where you create a Platform. To run the Platform, you also need to have Docker Compose installed on the target machine, which can be different to the one you use for generating the platform.
The generated platform can be provisioned either locally or in the cloud.
Show me how it works!
Make sure that you have already installed the Docker Engine, Docker Compose and the platys [1] toolset. For this demo we will create a simple platform with an Apache Kafka and Zookeeper cluster, including a service providing a user interface for Apache Kafka, so we can see that the platform is running correctly.
Next we will present the five steps to create and use a platform.
Step 1: Initialize environment
First create a directory, which will hold the platys configuration as well as the generated artefacts:
1mkdir platys-example
2cd platys-example
Now let's initialise the current directory to use the Modern Data Analytics Platform Stack. We specify the platform stack name trivadis/platys-modern-data-platform to use as well as the stack version 1.7.0 (1.7.0 is currently the latest version of this platform stack). With the -n option we give the platform a meaningful name. platys init -n demo-platform --stack trivadis/platys-modern-data-platform --stack-version 1.7.0 --structure flat This generates a config.yml file, if it does not exist already, with all the services which can be configured for the platform.
Step 2: Configure the platform
Now we can configure the platform, using the config.yml file which has been created by the init command above. In an editor (i.e. nano) open this configuration file.
1nano config.yml
You can see the configuration options, available through this platform stack, similar to this (only showing the first few lines)
 1 # Default values for the generator
 2 # this file can be used as a template for a custom configuration
 3 # or to know about the different variables available for the generator
 4      platys:
 5        platform-name: 'kafka-platform'
 6        platform-stack: 'trivadis/platys-modern-data-platform'
 7        platform-stack-version: '1.7.0'
 8        structure: 'flat'
 9
10      # ===== Apache Zookeeper ========
11      KAFKA_enable: true
12      # one of enterprise, community
13      KAFKA_edition: 'community'
14      KAFKA_volume_map_data: false
15      KAFKA_broker_nodes: 3
16      KAFKA_delete_topic_enable: false
17      KAFKA_auto_create_topics_enable: false
18
19      ...
You can now enable the options for the services you want the platform to support by changing false to true.
For enabling Kafka and Zookeeper, all we have to do is set the ZOOKEEPER_enable and KAFKA_enable flag to true. Additionally, we also enable the Apache Kafka HQ User Interface, so that we are able to see that Kafka is running in step 4.
 1  #zookeeper
 2  ZOOKEEPER_enable: true
 3  ZOOKEEPER_volume_map_data: false
 4  ZOOKEEPER_nodes: 1            # either 1 or 3
 5
 6  #kafka
 7  KAFKA_enable: true
 8  KAFKA_entreprise_enable: false
 9  KAFKA_volume_map_data: false
10  KAFKA_broker_nodes: 3
11  KAFKA_delete_topic_enable: false
12  KAFKA_auto_create_topics_enable: false
13
14  ...
15  AKHQ_enable: true
You only have to explicitly enable what you need, as each service is disabled by default. Other settings have meaningful defaults as well. So you can also remove the services you don't need.
Step 3: Generate the platform
Now we are ready to generate the platform. In the platys-example folder, run the following command:
1platys gen
and you should see an output similar to this
 1Running the Modern Data Platform Stack Generator ....
 2Destination = /home/bigdata/mdps-stack-test
 3
 4Process Definition: '/opt/mdps-gen/stack-config.yml'
 5Loading file '/opt/mdps-gen/stack-config.yml'...
 6Parsing YAML...
 7Loading file '/opt/mdps-gen/vars/default-values.yml'...
 8Parsing YAML...
 9Loading file '/tmp/custom-stack-config.yml'...
10Parsing YAML...
11Return cached file '/opt/mdps-gen/vars/default-values.yml'...
12Parsing YAML...
13Return cached file '/tmp/custom-stack-config.yml'...
14Parsing YAML...
15Render template: 'templates/docker-compose.yml.j2' --> 'destination/docker-compose.yml'
16Loading file '/opt/mdps-gen/templates/docker-compose.yml.j2'...
17Parsing YAML...
18Dumping YAML...
19Writing file '/opt/mdps-gen/destination/docker-compose.yml'...
20Render template: 'templates/mdps-services.yml.j2' --> 'destination/mdps-services.yml'
21Loading file '/opt/mdps-gen/templates/mdps-services.yml.j2'...
22Parsing YAML...
23Dumping YAML...
24Writing file '/opt/mdps-gen/destination/mdps-services.yml'...
25Modern Data Platform Stack generated successfully to /home/docker/Desktop/kafka-plaform-example
You now find a fully configured docker-compose.yml file (with the services enabled in the config.yml) as well as some static configuration files, necessary for the services.
Step 4: Run the platform
Now the Platform is ready to be started. Before doing that, you have to create some environment variables, depending on the services you use. In minimum you should create
DOCKER_HOST_IP- the IP address of the network interface of the Docker HostPUBLIC_IP- the IP address of the public network interface of the Docker Host (different to DOCKER_HOST_IP if in a public cloud environment
You can set these environment variables persistently on the machine (/etc/environment) or user (~/.pam_environment or ~/.profile) level. Another option is to use the .env file in the folder where the docker-compose.yml file is located. All environment variables set in there are used when the docker compose environment is started.
Now let's start the platform. In a terminal window, execute
1docker-compose up -d
Docker will start downloading the necessary container images and then start the platform.
To see the logs of all the services, perform
1docker-compose logs -f
You can list a number of service to only see a log for them
docker-compose logs -f <service-name> <service-name>
After a short while all the services should start up and the platform is ready to be used.
Step 5: Use the Platform
After a short while, the platform with Apache Kafka and Zookeeper should be up and running and ready to use. We can make sure that this is the case by either checking the log file or by navigating to the Apache Kafka HQ service, which provides a nice browser-based view into the Apache Kafka cluster.
In a browser, navigate to http://dataplatform:80.
In a browser window, navigate to http://<public-ip>:28107/ui/docker-kafka-server/node, replacing
The Kafka cluster is ready, and you can start creating Kafka topics, and publish and consume messages.
If you are finished using the platform, you can stop and remove it using the following command:
1docker-compose down
Note: be aware that this completely removes the Docker containers and by that all the data within it. If you haven't mapped the data outside the container, then you might lose your work!
At this point, you have seen the basics of how platys works using the modern-data-platform stack.